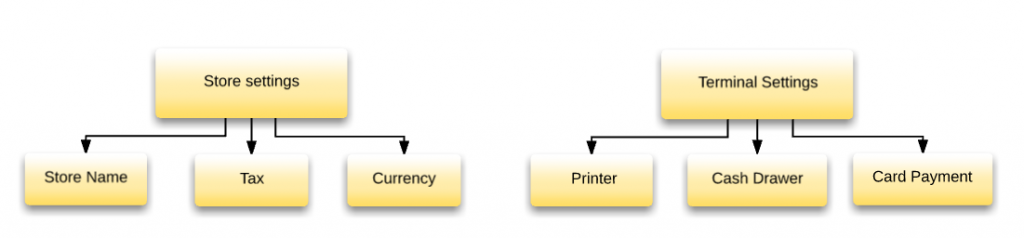
Restaurant/ Store settings
These are shared configuration across the terminals.
Terminal Settings.
These are the configurations stored in individual terminals. In Floreant POS, the administrator needs to go to each terminal and set these values.
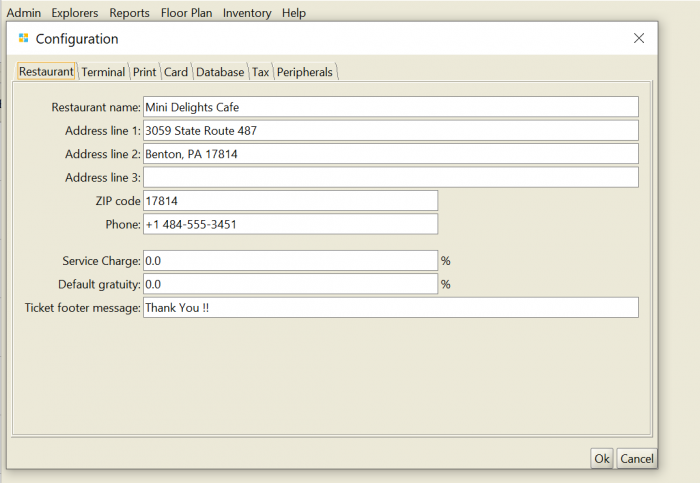
Restaurant tab
Store Configuration
Store details are exactly what you will see in Receipts and Reports. They should not be changed unless it’s necessary.
Keep the length of Restaurant name, Address line 1, 2 & 3 less than 14 characters so that they print nicely in small printers.
?To change store details go to back office→Admin→Configuration
Here you can add followings:
Restaurant name.
Address Line 1: Street Address.
Address Line 2: City, State.
Address Line 3: If Needed.
Zip Code.
Phone.
Service Charge: If you charge % of service charge use this field, otherwise leave it blank.
Default Gratuity: Enter a tip % over the total amount due if you have a fixed number, otherwise leave it blank.
Ticket Footer message: Some countries require to print Tax/Vat no in receipts. One Trick way is to use Unused Address field or Ticket footer. You may leave it blank too.
Terminal tab
Terminal number
In the default setting Floreant runs as standalone single terminal. Usually, the system generates a unique 4-digit terminal number. If you decide to have a different terminal number at the initial setup that should not be changed later on.
To change this settings go Back Office→Admin→Configuration→Terminal
Default Password LengthLogin Password must be protected and secured for each store employee.
Default password length can be changed to 6, 8 or 10.To Protect the Terminal and all its data from the unauthorized use of employees Database Configuration button should be disabled from the login screen. If database recreated by mistake it can erase all existing data.
Show Barcode on ReceiptThis will allow showing the barcode on receipt.
Group by Categories in Kitchen ReceiptItems can be viewed by sections under their menu categories instead of the sequence the order was originally taken. This may help the cook to get more organized.
Enable Multi-currencyFor using any other currencies other than US$, Multi-currency functions need to be enabled.
Enable Multi-currencyFor using any other currencies other than US$, Multi-currency functions need to be enabled.
Terminal LocationThis is the store address where the POS terminal resides in. This might be needed for Home Delivery orders to find the delivery distance. When you use the delivery plugin this will show you the exact distance in a map from the store address to the destination address.
Terminal LocationThis is the store address where the POS terminal resides in. This might be needed for Home Delivery orders to find the delivery distance. When you use the delivery plugin this will show you the exact distance in a map from the store address to the destination address.
Printer Types
Floreant support three different types of printers.
Printer type
Size
Note
Receipt
Thermal 80mm printer
Does not need any Printer Group
Kitchen / Packing
Impact 76mm printer
Must use Printer Groups
Report
A4 Desktop Printer
Does not need any printer Group
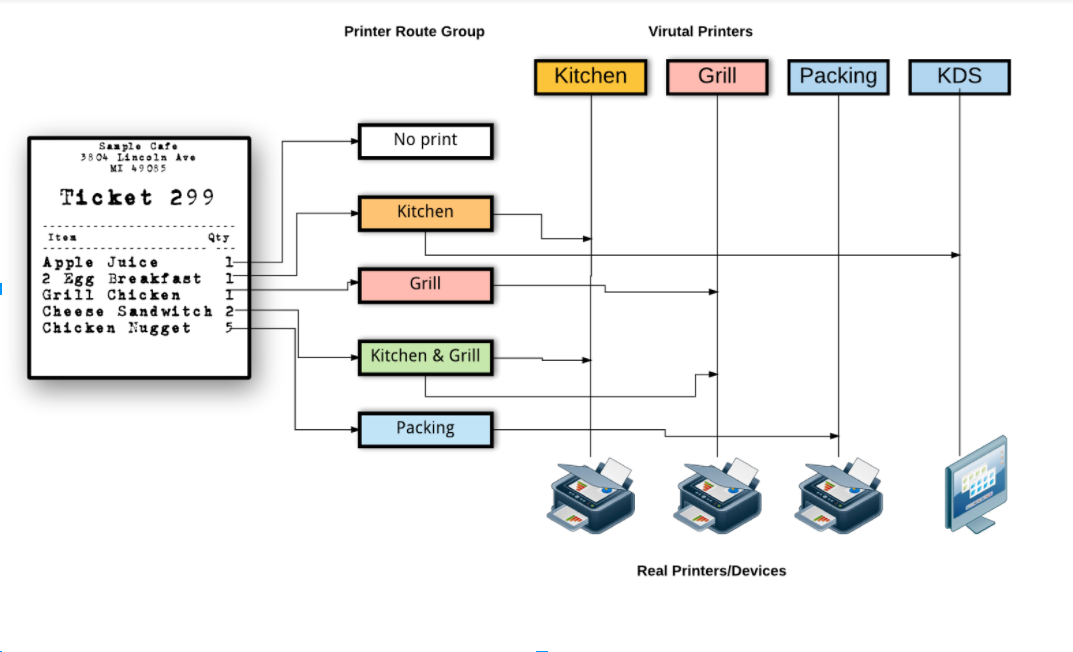
Print Tab
Printer Setup
Make sure you add printers in printer groups. You must make one printer group default. If no printer group is specified, items will be sent to this kitchen printer group. Do not mark any category of beverage. They will not be sent to kitchen printer.
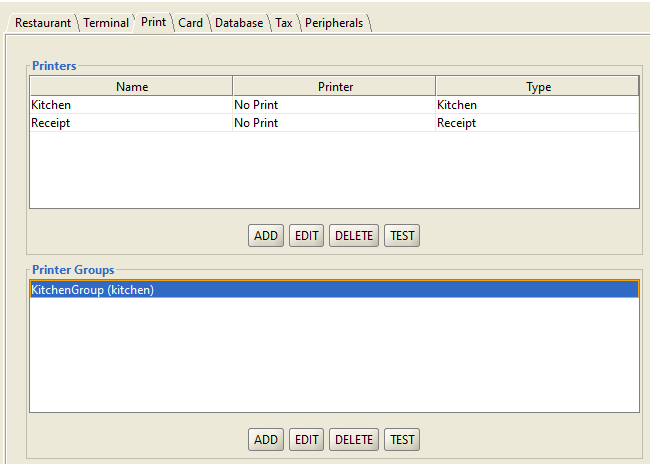
?Back office→Admin→Configuration→Print→Add→Printer Type
Follow the sequence
Add Receipt Printer
–Virtual Printer Name. Name it “Receipt”.
? If you do not want to print receipt select Do not print
Select Printer and Test it.
Add Kitchen Printer. -Name it “Kitchen” and save.
Add Printer group. -Name it “KitchenGroup”
-Add “Kitchen” in that group.
-Set it to default and press OK to save
– Select Printer Group and Test.
.? Even though you have one Kitchen Printer you must create a Printer group and set it as default. If you do not set default you have to go to each item and assign printer group.
You must use iReport 4.0.1 . Later version or Jasper studio may generate an incompatible file. Also, make sure you have switched back to JDK 7. iReport 4.0.1 will not run on JDK 8.
There are 2 files for every receipt & report template in config/printerlayouts folder. jrxml which is source and .jasper which is generated after compilation. To make sure ireport is creating a new .jasper file, remove the original .jasper file from the folder.
if your compilation is unsuccessful, Floreant POS may reload default .jasper file from its jar file.
Some files have subreports. You may need to modify all of them.
Often subreport’s margins affect your report spacing.
Tax Tab
VAT/Tax Included Sales Price mode
If you turn this on prices will include Vat/Tax.
Back office→Admin→configuration→tax→Items sales price includes tax.
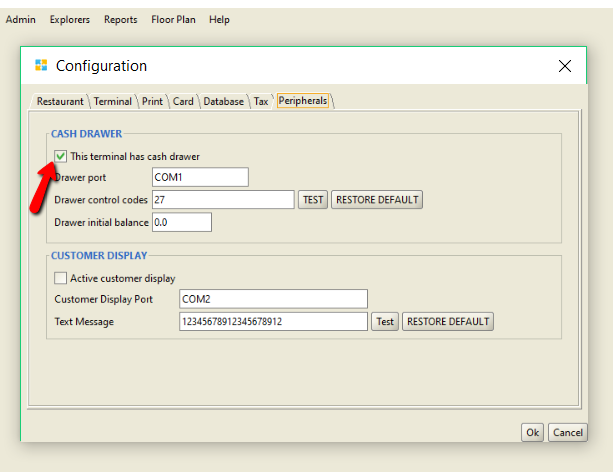
Peripherals Tab
Cash Drawer
? This is very important settings because if you uncheck Cash drawer, the terminal cannot take any kind of payment.
Cash drawers are usually connected at the end of the receipt printer. This is found that USB printers often fails to kick drawer. One simple fix is to set in the driver to always kick the drawer when receipt is printed.
?Back Office→Admin→Configuration→Peripherals
No Sale
If you need to make “No Sale”, the best way to do is to use a “Drawer Trigger” device. This device can directly connect cash drawer to your computer.
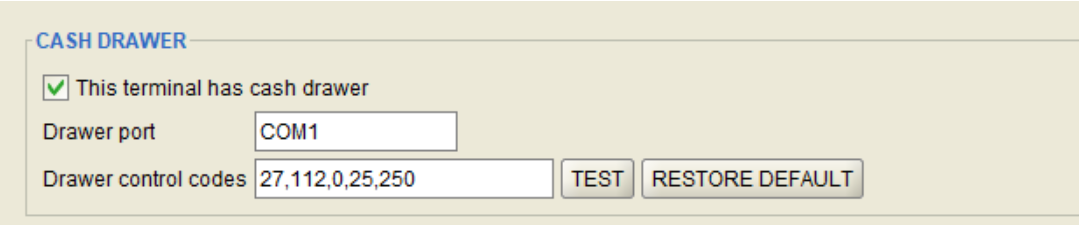
Cash Drawer Code
Cash drawers listen to a serial port ( or virtual port in Drawer trigger). If POS sends “Drawer control code” it kicks the drawer.
The most common code is 27 112 0 25 250.
?There is a known bug that may not save drawer control code separated with commas. Use space instead of comma like “27 112 0 25 250”.
In front-end Manager needs to assign a drawer to the employee and that will start order taking. And at the end of the shift drawer is closed and a receipt is printed.
Cash drawer assignment: Need to be assigned before starting the sale.