The follow Table illustrates Access Control Lists( ACL) for Floreant POS. System ships with an Admin user type who can access all the features. Aside those suggested ACLs there might be custom user type as a store may need. They they are then applied to individual employees/staff, as needed.
#
Action
Admin
Manager
Server
Jr. Server
Remark
1.
View All Open Ticket
✔️
✔️
✔️
Depends on #3.
2.
Create new ticket
✔️
✔️
✔️
✔️
3.
Void Ticke
✔️
✔️
✔️
Depends on #2
4.
View Back Office
✔️
✔️
5.
Authorize ticket
✔️
✔️
✔️
✔️
Depends on # 4
6.
Split Ticket
✔️
✔️
✔️
✔️
7.
Settle ticket
✔️
✔️
✔️
✔️
Depends on #2
8.
Reopen Ticket
✔️
✔️
9.
Payout
✔️
✔️
✔️
✔️
Depends on #2
10.
Drawer assignment
✔️
✔️
11.
Drawer pull
✔️
✔️
✔️
✔️
12.
View explorers
✔️
✔️
13.
View reports
✔️
Depends on #4
14.
Shutdown
✔️
✔️
15.
Refund
✔️
✔️
16.
Perform manager tasks
✔️
✔️
Depends on #2,4
17.
Perform administrative task
✔️
✔️
Depends on #2,4
18.
Manage table layout
✔️
✔️
19.
Booking
✔️
✔️
✔️
✔️
20.
Modify printed ticket
✔️
✔️
✔️
✔️
21.
Transfer ticket
✔️
✔️
✔️
✔️
22
Kitchen Display
✔️
✔️
✔️
23.
All functions
✔️
24.
Hold tickets
✔️
✔️
✔️
✔️
Depends on #2
25.
View all closed tickets
✔️
✔️
✔️
26.
Quick maintenance
✔️
✔️
Create User Permissions
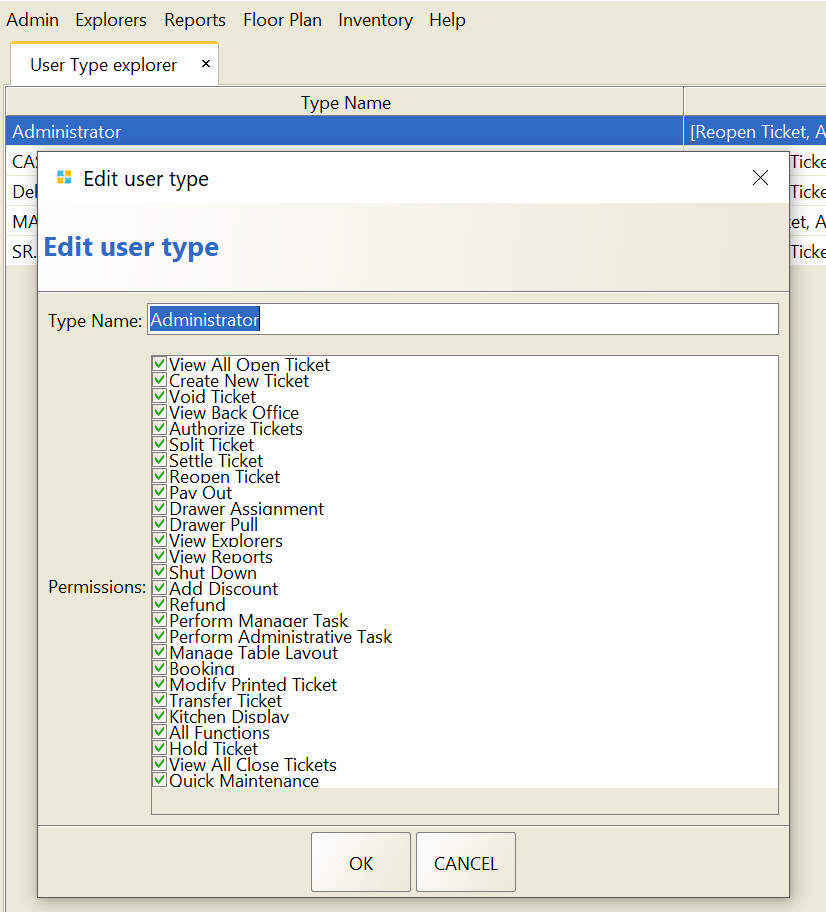
?Back Office→Admin→User Type–>Add
After adding the user Type name, we can select the followings and give that user the permissions required.
View All Open Ticket: By default a user can see only ticket created or owned by them. This permission allow them to see other’s ticket.
Create New Ticket: Giving permission to create new tickets.
Void Ticket: Giving permission to void tickets.
View Back Office: Giving permission to view Back Office.
Authorize Tickets: Giving permission to Authorize tickets.
Split Ticket: By this one a user will have the privilege to split the ticket any ratio they want.
Settle Ticket: Permission to settle a ticket.
Reopen Ticket: By this a user can reopen a settled ticket. If customer wants something more after a ticket has settled the employee who has the permission can reopen the closed ticket.
Pay out: Permission for paying out.
Drawer Assignment: Giving permission to assign drawer. Usually admin and the manager used to have this permission.
Drawer Pull: Giving the permission to pull the drawer.
View Explorers: Giving permission to view explore.
View Reports: Giving permission to view all kinds of reports.
Shut Down: Giving authority to shut down.
Refund: Permission to allow refund.
Perform manager Task: By default only manager used to do the managerial tasks but by giving this permission will allow the user to perform the managerial tasks.
Perform Administrative Task: Allowing the user to perform the administrative task.
Manage Table Layout: By giving this permission the user will be able to manage the table in any layout they prefer.
Booking: By Allowing table booking permission.
Modify Printed Ticket: If a ticket already sent to kitchen a server should not be allowed to void it. This permission will allow to let an employee to void such item.
Transfer Ticket: Allowing permission to transfer tickets to other server.
Kitchen Display: Permission to transfer the order to the kitchen display.
All Functions: Users like admin/manager may require all the functions of the system. By marking this one will allow the user to have the access for all the permissions.
Hold Ticket: Sometimes user may need to hold a ticket and take/settle another ticket. Giving the permission of hold ticket will allow a user to hold a ticket.
View All Closed Tickets: Allowing to view all the closed ticket.
Quick Maintenance: Permission allowing the maintenance.
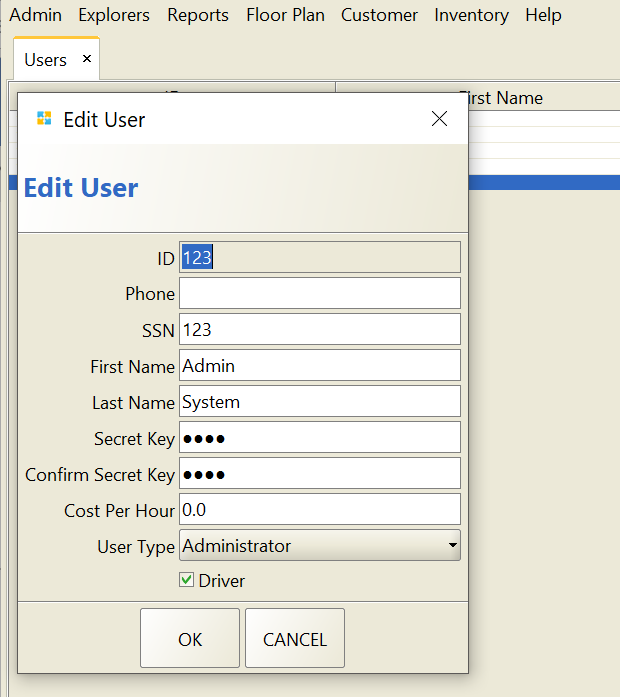
Create Users
?Back Office→Admin→Users–>Add
After you are done making user type, now you can add user under that user type. To add a user you need to do the followings:
ID: This number will generate randomly but you can give an ID number of your choice.
Phone.
SSN: Social Security number(Optional).
First Name.
Last Name.
Secret Key: Key that will be used by this user to log in into the system.
Confirm Secret Key.
Cost Per Hour: You can put the wages here to generate payroll.
User Type: Choose the user type from drop down list. Now the user will enjoy the permissions that user type has.
Driver: By selecting this you may declare this user as a driver too. Despite having the other privileges, this user will have the advantages to perform the drivers activity.